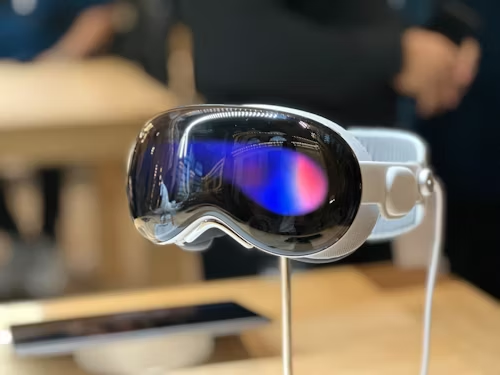
Virtual reality has been widely used in some countries, yet with the birth of Apple Vision Pro, it became the talk of many as it grabbed the spotlight on another level of VR technology. In this article, we will share the Apple Vision Pro guide, imparting the intricacies of this gadget in 2024.
Apple Vision Pro
Introducing Apple Vision Pro, a spatial computing device seamlessly integrating digital content and applications into your real-world environment, empowering navigation through eye gaze, hand gestures, and voice commands. Powered by visionOS, Apple Vision Pro offers access to built-in applications such as Apple TV, Safari, and Photos, enables space customization through Environments, facilitates communication via FaceTime calls, and allows for installing third-party applications from the App Store.
This guide serves as your comprehensive resource to unveil the myriad capabilities of Apple Vision Pro with visionOS.
Embark on your journey with Apple Vision Pro starting from Home View. Here, utilize the tab bar on the left to switch between Apps, People, and Environments seamlessly. Discover your favourite familiar applications in Apps View, which is easily accessible with a simple tap. People View facilitates seamless connections with others, while Environments View offers immersive landscapes, transforming your surroundings and enabling apps to transcend the confines of your physical space.
Apple Vision Pro Guide: 5 Easy Tips for Ultimate Experience!
Apps View
Access all your applications conveniently from one location—Apps View—on Apple Vision Pro. Alongside apps tailored explicitly for vision, the Compatible Apps folder houses well-known iPad and iPhone applications compatible with your Apple Vision Pro. Enjoy the flexibility of opening multiple apps and arranging them within your space according to your preferences.
In-Home View, your applique is displayed in a grid layout. Within Home View, you’ll find the Compatible Apps folder, which contains applications initially designed for iPad and iPhone that seamlessly integrate with Apple Vision Pro. To discover more apps, browse the App Store on Apple Vision Pro.
To launch an app:
- Press the Digital Crown to access Home View.
- If you don’t immediately spot your apps, navigate to the tab bar and tap on “Apps.”
- Swipe through your apps to browse. Tap “Apps” in the tab bar to quickly return to the first page.
- Alternatively, access Control Center, tap the Control Center button, then select the Search button to locate an app.
- To open an app, focus on it and gently tap your fingers together.
- You can also use voice commands by looking at the app and saying, “Siri, open this.” For Siri setup and activation instructions, refer to “Set up and activate Siri on Apple Vision Pro.”
- App windows will open where you’re looking. You can move app windows to a different location, adjust the window size, or close and quit apps as needed.
People View
Through People View, you can maintain connections with friends, family, and colleagues. Here, you can initiate FaceTime calls, send messages, access contact details, including birthdays and addresses, and engage in various other communication activities.
To initiate or receive FaceTime calls on Apple Vision Pro:
Starting a FaceTime Call:
- Navigate to Home View and select “People” from the tab bar.
- Press the “New FaceTime” button, then opt for “New FaceTime.”
- Alternatively, tap on a contact in People View.
- Enter the name, number, or email address of the person(s) you wish to call. Multiple recipients can be selected.
- Tap the “FaceTime” button for a video call or the “Audio Call” button for an audio call.
Receiving a FaceTime Call:
- The FaceTime icon will appear at the top of your View when a FaceTime call is incoming.
- Tap to select it, then tap “Join” to accept the call.
- Alternatively, tap “Join” under the contact in People View. To decline the call, tap “Dismiss.”
Creating a FaceTime Call Link:
- Tap the “New FaceTime” button, then choose “Create Link.”
- Select a method for sending the link (e.g., Mail or Messages), or tap “Copy.”
- Optionally, add a name to the link for identification purposes.

Environments View
Experience immersive transformations of your surroundings with Environments, which showcase stunning three-dimensional scenes. Utilize the Digital Crown to fine-tune your immersion level, revealing more or less of your environment at your discretion. Within an Environment, the Control Center adjusts sound volume, such as rain sounds in Mount Hood, and offers the option to toggle between Light and Dark modes.
Experience Environments on Apple Vision Pro allow you to transport your physical space to various locations, such as Yosemite, Mount Hood, or even the Moon. Mail, Safari, and other apps can utilize these immersive settings.
Certain apps feature exclusive Environments explicitly tailored for their use, such as a Conference Room for rehearsing a Keynote presentation.
Tip: Enhance your Environment experience by utilizing Siri. For instance, say, “Siri, take me to the Moon.”
Selecting an Environment:
- Navigate to Home View and select “Environments” from the tab bar.
- Choose an Environment option, such as White Sands or Yosemite, or select alternatives like Summer Light or Winter Light to alter the room’s appearance subtly.
- Experience accompanying effects within Environments, such as rain in Mount Hood. Note that some effects may only be accessible when no apps are open.
Adjusting Environment Appearance or Volume:
- Toggle between light or dark appearances or modify the volume of environmental sounds.
- To adjust immersion, rotate the Digital Crown. While adjusting the Digital Crown, watch the Environments icon at the top of your View, depending on your activity.
- You can set the appearance by accessing the Control Center, tapping the Environments button, and selecting Light, Dark, or Automatic.
- You can adjust the volume of Environment sounds by accessing the Control Center, tapping the Volume button, and dragging the volume slider accordingly.
Note: Adjustments cannot be made for Summer Light, Winter Light, Fall Light, Spring Light, or Morning Light. Additionally, you can access additional settings by opening Settings and selecting Environments.
Control Center
To access the Home View and Notification Center, check the current time and battery level, and enjoy additional functionalities with Control Center, glance upwards and tap the Control Center button near the top of your View.
Control Center provides swift access to essential controls such as search and volume adjustments, features like Guest User and Travel Mode, and displays all your notifications. Additionally, you can utilize the Control Center to check the battery level and view the current date and time.
- Access Control Center
To open the Control Center, direct your gaze upwards and tap the Control Center button near the top of your View.
If you cannot locate the button, ensure your head remains stationary while looking up, and verify that no apps obstruct the top of your View.
Please note: The button’s appearance may vary in colour depending on your current activity.
- Customize Control Center Placement
Adjust the positioning of the Control Center button according to your preference.
Navigate to Settings > Control Center, then specify the desired height for the button to appear.
- Add or Remove Control Center Options
Tailor the controls available in the Control Center to suit your needs.
Visit Settings > Control Center, then manage to add or remove controls as desired.
- Adjusting the Fit of Your Apple Vision Pro
Apple Vision Pro offers various customization options to ensure a personalized fit tailored to your comfort and safety. You may receive notifications regarding fit adjustments throughout your usage, such as repositioning the device or considering alternative Light Seal Cushions or Light Seals.
It’s essential to ensure that your Apple Vision Pro fits correctly. A proper fit, including the appropriate Light Seal and headband for your face and head shape, is crucial for a comfortable and secure experience. If you require vision correction, you can opt for either contact lenses or the compatible ZEISS Optical Inserts, as traditional eyeglasses are incompatible with Apple Vision Pro.
Please note that Apple Vision Pro is intended for individuals aged 13 years and older.

Safety
Before using Apple Vision Pro, carefully review all warnings and safety guidelines to ensure safe operation and minimize potential risks.
Periodically adjusting the fit of your device can enhance comfort during prolonged use. Experiment with minor adjustments to find the most comfortable fit for your preferences.
To reduce the risk of injury, it’s advisable to remove facial piercings, such as nose or eyebrow rings, while wearing Apple Vision Pro. Additionally, refrain from using the device if you have any preexisting facial injuries to prevent aggravation or further discomfort.
If your eyelashes are making contact with the device’s displays or if you receive notifications indicating proximity issues, consider using the thicker Light Seal Cushion provided with Apple Vision Pro. This accessory can help alleviate discomfort and improve the overall fit of the device. If problems persist, you may need to explore alternative Light Seal sizes to find the most suitable option.
Always ensure that the Light Seal and Light Seal Cushion are correctly sized for your face when wearing Apple Vision Pro. These components help reduce the risk of eye and facial injuries and contribute to a more comfortable wearing experience overall.
ZEISS Optical Inserts or contacts can be used with Apple Vision Pro for individuals requiring vision correction. Remember that using ZEISS Optical Inserts may necessitate a Light Seal Cushion of a different size than when not using them, such as with contact lenses. In rare cases, you may also need a light seal of a different size while using ZEISS optical inserts.
If you experience persistent or severe physical discomfort while using Apple Vision Pro, it’s essential to discontinue use and seek alternative solutions. Your comfort and well-being are paramount, and any discomfort should be addressed promptly to prevent further issues.
Like other personal electronic devices, taking regular breaks during extended usage sessions is recommended to alleviate eye strain and ensure maximum comfort. Incorporating short breaks into your usage routine can help minimize discomfort and maintain overall comfort.
Conclusion:
In summary, Apple Vision Pro revolutionizes your digital experience, starting from Home View. Seamlessly switch between Apps, People, and Environments using the tab bar. Access your favourite applications instantly in Apps View, connect effortlessly with People View, and immerse yourself in transformative landscapes with Environments View. With Apple Vision Pro, the boundaries of physical space are transcended, offering an unparalleled journey of exploration and connectivity.


